Fields of Despair
“Our knowledge of life is limited to death”
― Erich Maria Remarque, All Quiet on the Western Front
Game Review by Mark Scarbrough
Introduction
Fields of Despair: France 1914-1918 from GMT Games is a two player
hex-based strategic level block game set on the Western Front of World
War I. Players control either the Allies, consisting of the French, British,
Belgians and Americans, or the Central Powers. The war on the eastern
front and at sea is also simulated in a satisfying but somewhat abstract
manner. Fields of Despair makes good use of the block war game’s
strength’s while maintaining simplicity in the rules and an intuitive style
that keeps the game fresh and easy to play. Finally, this game is a must
have for any war gamer that has an interest in World War I. While the
game covers the entire war, it is appropriately divided between a mobile
period (1914), a static period, (1915-1916) and a late war period
(1917-1918). This article will focus on some of the strategic considerations
confronting both the allies and the central powers during the mobile period
of the game while discussing some of the key mechanics of the game.

The Schlieffen Plan was the name given to the German plans for the invasion
of France and Belgium. German strategy under the Schlieffen Plan was to give
priority in men and material to offensive operations against France and to
maintain a defensive posture in the east against Russia. The German army
in the west would weight its strength on the right wing with the intention of
cutting through Belgium and avoiding the strong French defenses in the south.
It was thought that Germany could win a quick victory, before the Russian army
could fully mobilize, thus allowing the German army to defeat France decisively
before turning to deal with the Russians in the east.
France had her own plans and initiated its own strategy called Plan XVII once
the war began. This resulted in the Battle of the Frontiers as Plan XVII initiated
an offensive into Alsace-Lorraine and Belgium. However, the French attack was
repulsed with costly early losses.
While each side had its ideas on how the war should and would be fought,
neither France nor Germany was able to effectively implement its plan as
envisioned. The final result was four years of bloody attritional warfare on
the western front.
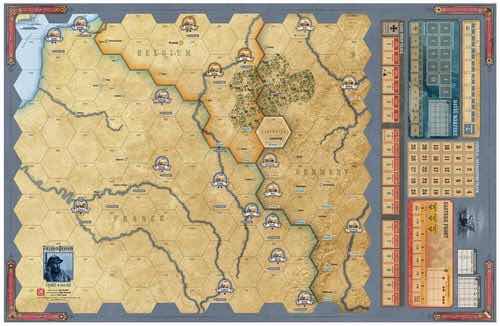
Strategic Situation
The game nicely models the two plans in the mobile period as each side seeks
to capture its objectives and win quickly, before the game moves into the static
period. Germany’s objectives are located in Belgium, the channel ports, and
the central region. Alternatively, Germany can win by taking Paris. The French
objectives are located in southern Belgium, Luxemburg and Alsace-Lorraine.

Belgium
There are three German objectives in Belgium at the start of the game, Liege,
Namur and Antwerp. Each is a level 2 fortification lightly defended by Belgium
infantry. The Germans begin with some 34 odd strength points of infantry and
3 of cavalry along the Belgium border and an additional 8 of infantry and 2 of
cavalry just north of Luxemburg. Finally, in reserve there are 15 strength points
of infantry in Koblenz. In contrast, the allies have only 6 strength points of
infantry in all of Belgium. The Germans have some initial concerns when considering
their first turn or two. The German player not only needs to capture the Belgium
forts, but he should also gain crossings of the Meuse River. Finally, he must
adequately protect the French victory locations in southern Belgium. The difficulty
in the opening for the Germans is finding the right balance between sufficient forces
in the right hook and holding off French counter attacks aimed at the Plan XVII objective
locations. Similarly, the French player must not be too defensive minded or risk missing
opportunities to attack and capture valuable victory locations. The Meuse River south
from Namur to Verdun makes a strong natural defensive line for the French. The German
player should take care to push through to it before the French have the opportunity to
set their defensive lines. In the campaign game, the Germans get a ‘free’ turn in which to
attack Belgium before the game starts. In essence, this allows for back to back German
turns. The Germans must use this opportunity to overrun as much of Belgium as possible,
but too much of a focus on the Belgium forts could see French units taking up solid positions
on G03 and G04 and the British infantry in Maubeuge moving into the key hex at G02.

Assuming the Germans make reasonable progress in Belgium, the Germans will now be
confronted with what could be the most important decision in the game. There are really
only three choices. A sweep west along the north edge of the map with the intent to take
the channel ports at Calais and Dunkirk, or an immediate turn southwest toward Maubeuge
with the idea of pushing through to Rheims. Finally, the German player could try to
accomplish both. Whatever choice is made, supply issues will have an impact depending
on the choices made at this stage. The game models supplies in a simple yet interesting way.
At the beginning of each scenario both sides have a supply allocation level that allows them
to supply a certain number of hexes. Each turn this will diminish unless scarce economic
resources are used to maintain the level or even increase it.
The in game supply forces each side to try and keep as short a line as possible in order to
minimize the impact of supplies or lack of supplies on their forces. For the Germans, this
means a sweep into western Belgium will undoubtedly stretch the supply lines. Any push
toward the channel ports will involve forward detachments of cavalry and each of these
cavalry detachments will increase the supply requirement. This would seem to suggest that
pushing on toward the channel ports is a dangerous thinning of the lines and supply. It may
be but the benefits are tempting. Both Calais and Dunkirk are worth victory points.
Additionally, assuming the Germans capture Antwerp, the British army will cross the channel
and begin deploying in these locations, so taking the channel ports will deny these landing
locations to the British and force the British to arrive to the south along the west map edge.
An immediate turn southwesterly, following the capture of the Belgium objectives, also has
merit. By ignoring the channel ports and wheeling toward Maubeuge, the Germans can
maintain a more economical supply line and a better concentration of forces. It’s also faster,
leaving the French with fewer reinforcements to commit. However, a balance must still be
maintained. The more success the Germans have driving in the middle, the more exposed
their right flank in Belgium will become. This will undoubtedly be a tempting target for the
British army as it lands and invariably pushes east into western Belgium.
This central strategy, for the lack of a better term, also means fighting large battles in the
fortified areas of Maubeuge and Rheims as the allies will commit as many troops as possible
into the center as the French receive their reinforcements in Paris, which places them very
close to these important towns. While the Germans should seek the opportunity to fight a
decisive battle if the conditions are right, battles fought on the fortified areas are more difficult
and will result in higher losses for the Germans and fewer for the allies.
Due to the fog of war inherent in block games, the German player can disguise his focus to
some extent. The allies must then use air reconnaissance effectively to determine which
direction the main German attack will take. This can be a tough time for the French; the
Germans seem all powerful with an endless supply of men and material. The key is to stretch
the Germans, use counter attacks to threaten flanks and attempt to bleed the German army at
every opportunity. Once the allies weather the initial German storm, it will take time for
German follow on forces to reach the front as German reinforcements begin far from the front,
hopefully giving the allies the time needed to form a cohesive line.
The South
Finally, while both sides have the opportunity to attack in the south, the Germans have to be
very careful. The French can afford for things to go a bit sideways relying on their robust
fortifications at Nancy, Epinal and Belfort as a second line of defense. However, the Germans
do not have the same luxury with five Plan XVII victory locations in open areas along the border.
While the Germans can retreat to the fort at Strasburg in event of a disaster, it will likely result in
the French taking multiple victory locations.
As in the Belgium region, both sides have to find the appropriate balance of force commitment
in the south. If the Germans divert too much from the right, they will fatally weaken the main
attack through Belgium. If the French overcommit, they will not have sufficient forces in the center
and north to stop the Germans from winning the game during the mobile period.
Additionally, both sides should consider the long game. The allies can take a stall strategy, and seek
to ensure the game continues into the static period with the idea they will win in the long run. The
German player’s chance of success once the front becomes static is not as certain, and they should
approach the early game from this mindset.

Abstracted Areas of the Game
While abstracted to a great degree, the German player will need to manage certain aspects of the
Russian front. If left ignored, the Central Powers can lose the game due to Russian victories on
the eastern front. The Germans can also conduct unrestricted submarine warfare with the
understanding that the Americans may be pushed into an early entry to the war.
The allies also have to consider whether to strengthen the naval blockade, thus diminishing the
German war economy. Again, this is a tradeoff requiring the use of vital economic resources that
could have been used on the western front.
In addition to the balancing of force commitments required by both sides in the early portion of the
game, each side will need to manage various aspects of the war economy; players are required to
manage supply levels, artillery and aircraft maintenance. Further, both sides can research poison
gas, gas masks, tank and aircraft advances.
These topics are handled well by the game, adding more depth and player choices while not
significantly complicating game play.
Transition to Static Phase
Finally, as the mobile period of the game comes a close its time to start thinking about where the
lines will solidify. As the German player, the victory conditions will change and it’s important to
maintain a presence in France while considering supply issues and bulges in the lines that might
make tempting targets. The French have similar supply concerns and should look for ways to
squeeze the Germans out of France.
Summary
I have played a few strategic level WW I games over the years such as Paths of Glory and The
Guns of August. Fields of Despair is a much more abstract simulation than those games. However, I
would argue that it’s actually a bonus rather than a detriment. It gives the feel or the war, gives
players strategic choices that need to be made without bogging down in too much detail. In closing,
this is a fun game that I highly recommend. It plays fast, although the campaign game is still a
significant time commitment, and you can get to roll a lot of dice!